Automate Your SEO Indexing Strategy With Python and WordPress
Setting up a good indexing strategy will help you get rid of duplicate pages and useless ones that have no traffic or impressions. Removing the duplicate pages will help you reduce keyword cannibalization and rank better on the newly added content on your website.
I have discussed finding duplicate posts and topics on your website and dealing with outdated content in my latest posts. This post will discuss how to automate your indexing strategy by removing unwanted pages from the Google index by updating their status directly from python to WordPress without touching the CMS.
This script is very useful if you have a website with a large number of pages that are not driving any traffic or are simply outdated.
This tutorial will work only with WordPress sites that are using the Yoast SEO plugin. We will define the pages we want to noindex and execute queries to the WordPress database to update their status.
This tutorial will include the below steps
- Get URLs from the XML sitemap
- Get traffic data from Google Search Console API
- Analyze the data and decide which pages to noindex
- Get the posts IDs from the WordPress database
- Update the index status for the posts
This is an advanced tutorial that will execute MySQL queries on your database, so make sure to apply it first on a staging environment to make sure that it is working, then you can move to the production server. And always take a backup from your database before doing anything.
Get the Complete List of URLs from the WordPress Yoast XML Sitemap
We will start by getting the full list of URLs of any WordPress website using the Yoast SEO plugin.
The website I will work on in this tutorial was built for educational and experimental purposes. All the content is scraped from other websites, and the resources are mentioned at the end of each page.
Import the libraries
import pandas as pd
from urllib.parse import unquote
import requests
from bs4 import BeautifulSoup as bs
from tqdm.notebook import tqdm
from datetime import date
Define a user agent and website URL
ua = "Mozilla/5.0 (Linux; {Android Version}; {Build Tag etc.}) AppleWebKit/{WebKit Rev} (KHTML, like Gecko) Chrome/{Chrome Rev} Mobile Safari/{WebKit Rev}"
website_url = "https://www.selectcaredirect.com/"
posts_xml = requests.get(website_url + "/sitemap_index.xml",headers={"User-Agent":ua})
Parse the URLs from the XML sitemap index and git rid of the uploads to keep only the posts
posts_xml_content = bs(posts_xml.text,"xml")
posts_sitemap_urls = posts_xml_content.find_all("loc")
post_sitemap_count = 0
for sitemap_item in posts_sitemap_urls:
    if sitemap_item.text.find("post-") > -1:
        post_sitemap_count += 1
Read and parse the URLs from all the XML sitemaps, and store them in a Pandas data frame
xml_list = []
urls_titles = []
for i in tqdm(range(1,post_sitemap_count + 1)):
    xml = f"{website_url}/post-sitemap{i}.xml"
    xml_response = requests.get(xml,headers={"User-Agent":ua})
    xml_content = bs(xml_response.text,"xml")
    xml_loc = xml_content.find_all("loc")
    for item in xml_loc:
        uploads = item.text.find("wp-content")
        if uploads == -1:
            xml_list.append(unquote(item.text))
            urls_titles.append(unquote(item.text.split("/")[-2].replace("-"," ").title()))
xml_data = {"Page":xml_list,"Title":urls_titles}
xml_list_df = pd.DataFrame(xml_data,columns=["Page","Title"])
xml_list_df.to_csv("urls-from-xml.csv",index=False)
print("Done")
Now we have all the posts URLs from our website
xml_list_df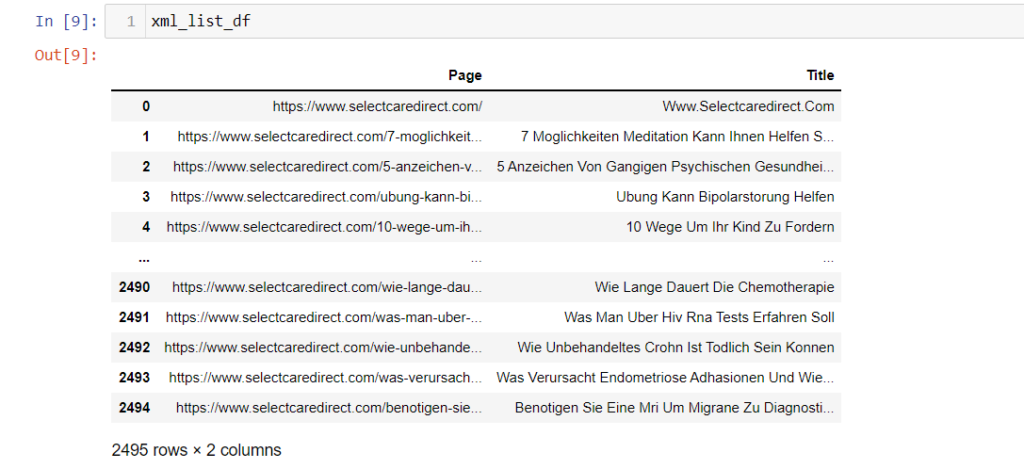
Get the Traffic Data from Google Search Console API
Now, we need to get the traffic for our posts from Google Search Console. The best way to do that is to use Google Search Console API to return the complete data for the last 16 months.
You can do that by using an add-on on Google Sheets called Search Analytics for Sheets (tutorial) or using a Python script that our friend Jean Christophe has written before. I recommend visiting his blog to learn more about Python and SEO.
Analyze the Traffic and Merging the Data
After getting the data from Google Search Console API, we need to import this data to our script. We can do that by using the Pandas library.
gsc_data = pd.read_csv("source/gsc_data.csv")
gsc_data
We can see that only 925 from 2495 pages have clicks and impressions, and the rest of the pages are not getting anything for many reasons. (i have mentioned before that this website is only for learning and experimenting)
Now we want to merge the two datasets to analyze the data. We will merge the complete URLs list with the links that have clicks and impressions.
merged_data = pd.merge(xml_list_df,gsc_data,on="Page",how="left")
merged_data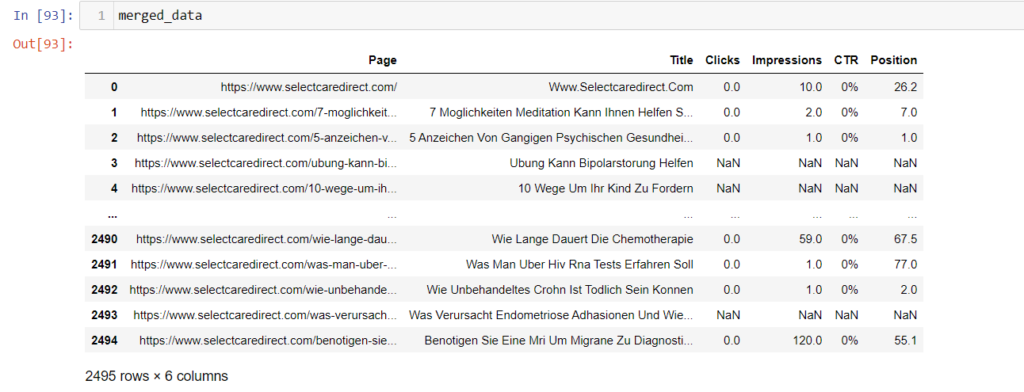
Let's assume that our strategy will be to noindex any URL with 0 impressions in the last 16 months.
Don't follow these steps blindly. You will break your website ranking. It would be best if you had a solid indexing strategy depending on your data.
We will divide the URLs into two groups, URLs with impressions and URLs without impressions. We can do that by following the below steps.
def update_impressions(impressions):
    if impressions != impressions:
        return "No Impressions"
    else:
        return "Has Impressions"

merged_data["Impressions"] = merged_data["Impressions"].apply(lambda impressions : update_impressions(impressions))

merged_data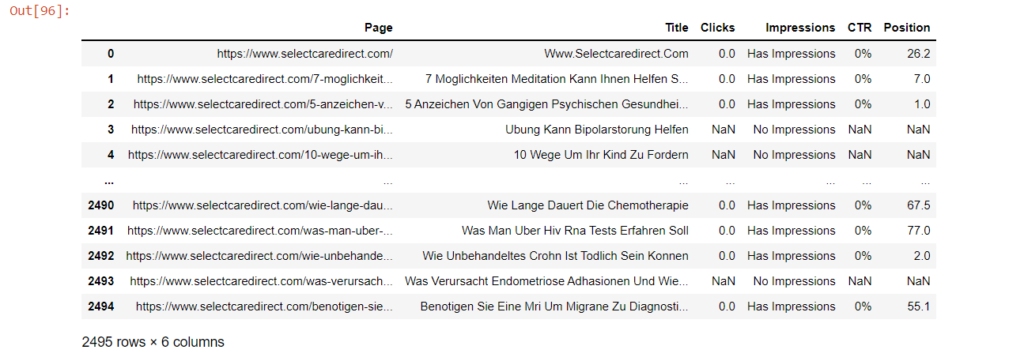
Analyze the Traffic With Python
Now we will analyze the traffic with Python to see the percentage of our pages that have impressions.
import matplotlib.pyplot as plt

impressions_count = merged_data.loc[merged_data["Impressions"] == "Has Impressions"]
no_impressions_count = merged_data.loc[merged_data["Impressions"] == "No Impressions"]

impressions_groups = [len(impressions_count),len(no_impressions_count)]
plt.pie(impressions_groups,labels=["Has Impressions","No Impressions"],autopct='%1.1f%%')
plt.title('Impressions')
plt.axis('equal')
plt.show()
We can see that 75% of the pages have 0 impressions, and only 25% have impressions from the total number of 2495 pages.
Getting the IDs of Each Page From the WordPress Database
Now we need to get the ID for each post from the WordPress database, and we will be using these IDs to execute queries to noindex these pages.
Before that, we need to get the page's slug. The slug is the part of the URL after the TLD.
Example
Full URL
https://www.selectcaredirect.com/ubung-kann-bipolarstorung-helfen
Slug
ubung-kann-bipolarstorung-helfen
Usually, WordPress uses the post's title as the slug, but you can change it as you want.
no_impressions_count["Slug"] = no_impressions_count["Page"].apply(lambda page : page.split("/")[3])
no_impressions_count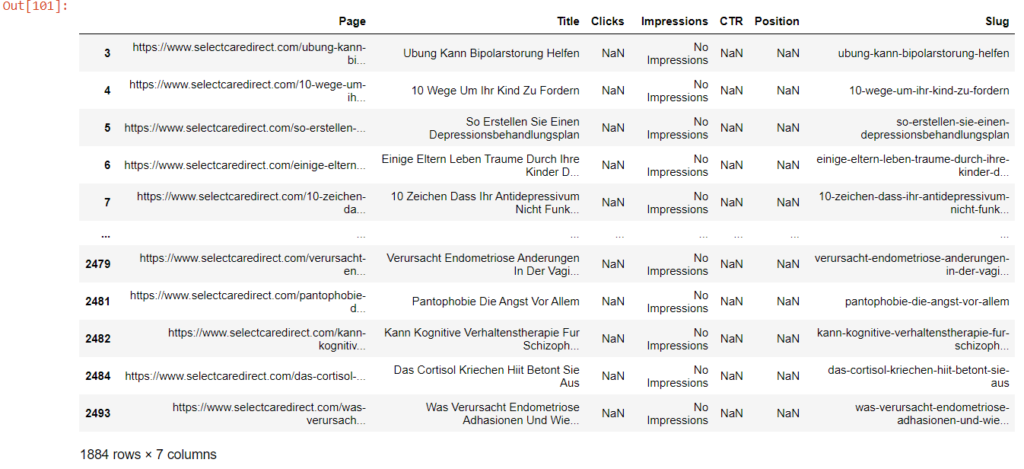
WordPress Database & tables structure
The structure of the WordPress database is clear and easy to understand. We will talk about the tables that we will be using in this tutorial.
The most important table is wp_posts; in this table, WordPress stores all the details about our content, and a big part of our work will be on this table.
WordPress Posts Table Structure
You can get any table's structure in MySQL by typing the below command in MySQL Workbench or the Linux terminal.
describe table_name;In our case, we want to see the fields in the wp_posts table
describe wp_posts;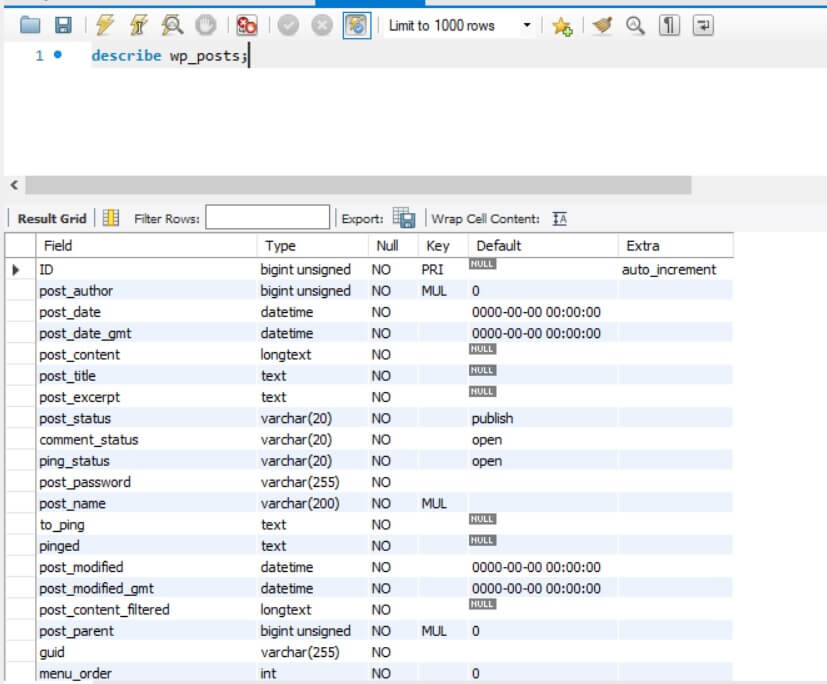
| Field Name | Description |
| ID | Post's ID |
| post_author | The author's ID |
| post_date | Published date |
| post_title | Post's title |
| post_status | Post's status, where it can be "publish" or "draft" |
| post_name | the slug of the post (we will use this field) |
| post_type | Post's type, the default is "post" |
How to Get the Post ID in WordPress using MySQL Query and Python
After understanding the structure of wp_posts table, we can easily get the ID for each post by executing a query to return the ID where the slug is equaled to our data.
select id from wp_posts where post_name = "post slug from our data frame";In Python, we can do it by following the below steps.
Importing the library
import mysql.connectorEstablish a connection to your database
mydb = mysql.connector.connect(
  host="localhost",
  user="root",
  password="root",
  database="my_db_name"
)
In this step; you need four things
Host IP
The IP of the server that you are hosting your website on, in most cases it will be localhost.
Database Username
The username of the database. Here I am using root as an example.
Database Password
The password of the database; again I am using root as an example
Database Name
The name of your WordPress database.
Define a function to execute the queries
def get_wp_id(slug):
sql = f"select id from wp_posts where post_name = '{slug}';"
wp_id_query = mydb.cursor(buffered=True)
wp_id_query.execute(sql)
wp_id = wp_id_query.fetchone()
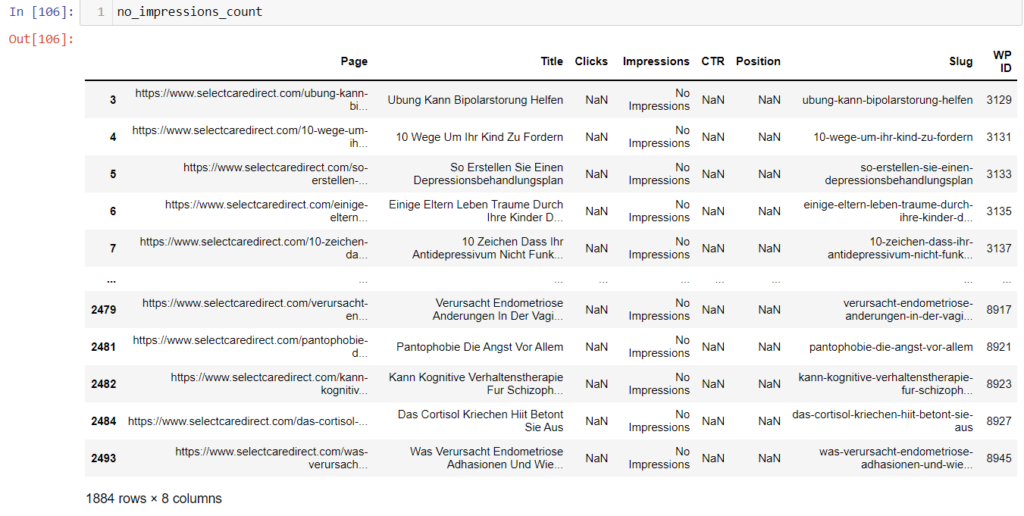
return wp_id[0]Create a new column in our data frame and insert the WordPress ID inside it
no_impressions_count["WP ID"] = no_impressions_count["Slug"].apply(lambda slug : get_wp_id(slug))
no_impressions_count
Now we have the WordPress post id for each URL
How to noindex WordPress Posts with Python
This is the most important step in our script, where we will execute queries to update the indexing status for each post in our data frame.
The following query will be executed on a table called wp_yoast_indexable. This table is added by the Yoast plugin, where the plugin store all the indexing details inside it.
The "wp_" prefix is the default that WordPress adds to each table. You can choose another one when installing a new WordPress which is recommended for security reasons.
Before that, let's take a look at the wp_yoast_indexable table to understand its structure. you can do that by typing the following snippet in MySQL Workbench or on your Linux terminal
describe wp_yoast_indexable;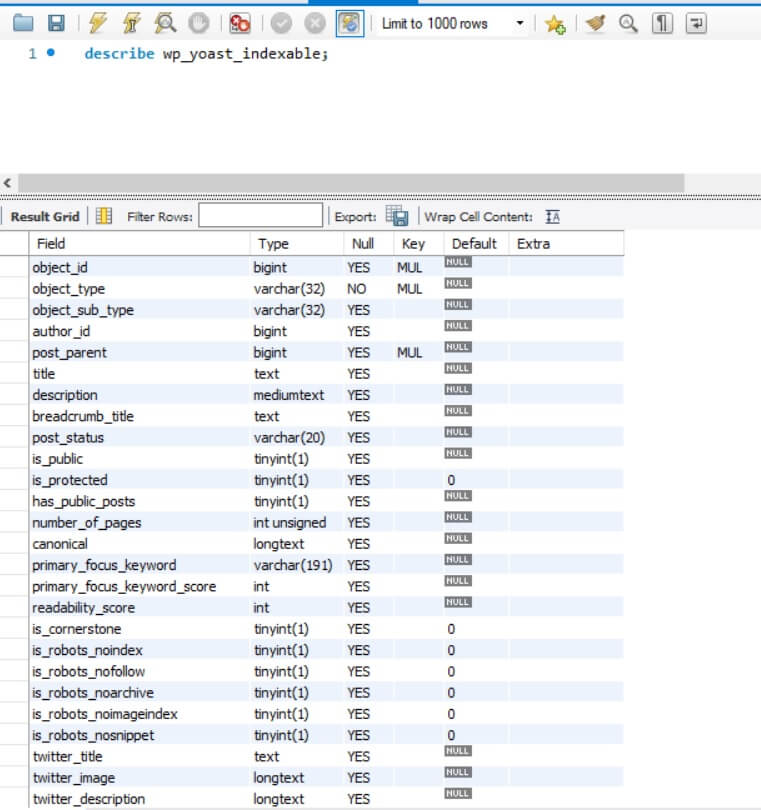
Below are explanations for some of the fields in the wp_yoast_indexable table
| Field Name | Description |
| object_id | Post's ID |
| object_type | Post's type |
| breadcrumb_title | Breadcrumb's title |
| canonical | The canonical link of the post |
| primary_focus_keyword | Focus keywords |
| readability_score | Readability score (green and red colors, don't trust them) |
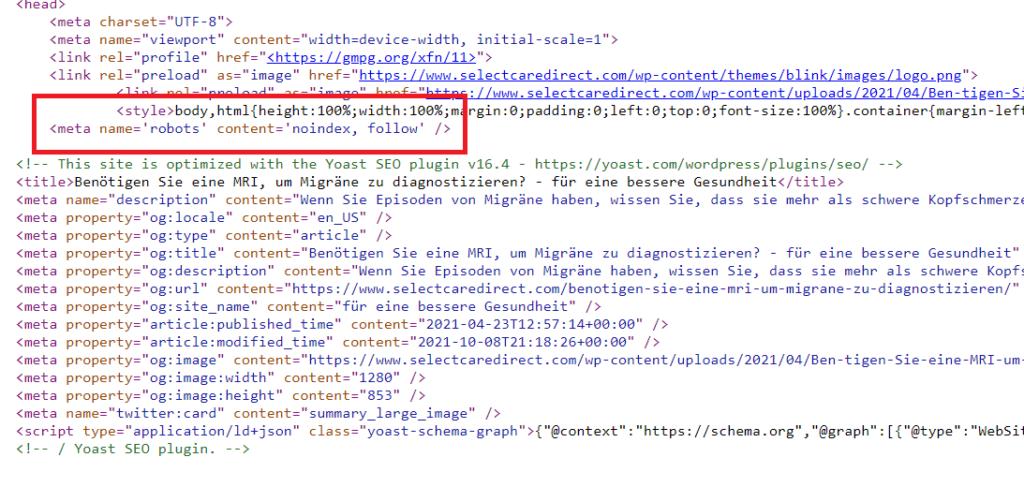
| is_robots_noindex | Meta robots status (we will use this field in our script to add noindex) |
| is_robots_nofollow | Meta robots status to add follow or nofollow |
| open_graph_title | OG title |
| open_graph_image | OG image |
As you can see, you can control almost everything related to SEO from this table, it's very powerful, and you can do many automation works using it.
Our query will update the indexing status depending on the post id that we have in our data frame from NULL to 1. The value 1 means noindex, and NULL or 0 means index.
There is a relation between wp_posts and wp_yoast_indexable which is the post ID. in wp_posts, the field is called ID, and in wp_yoast_posts its called object_id.
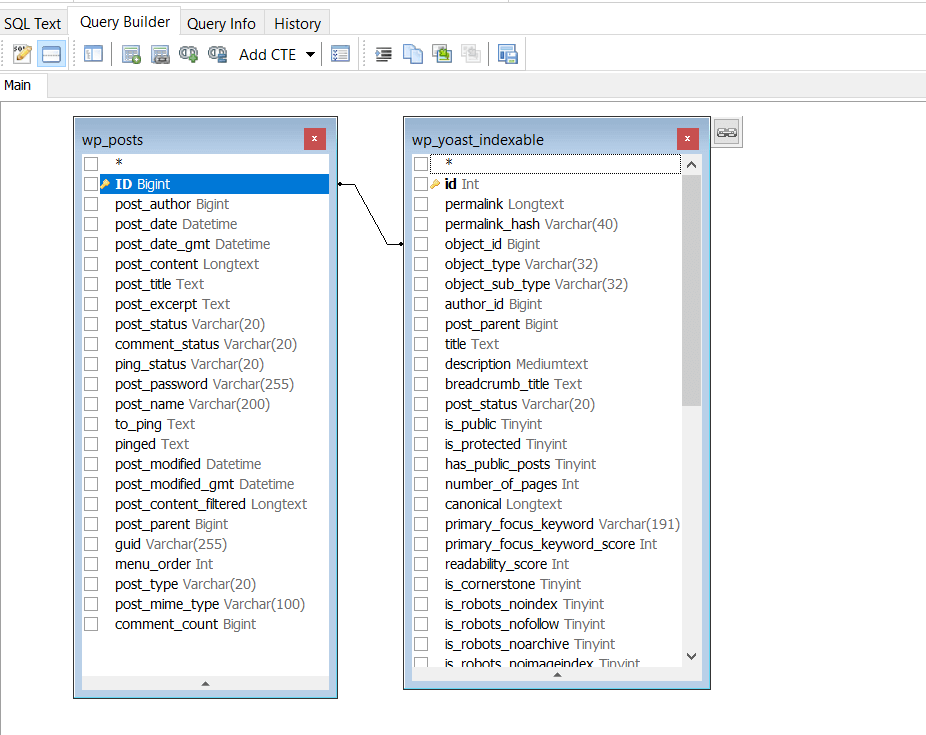
so our query will look like this
update wp_yoast_indexable set is_robots_noindex = 1 where object_id = 12345;"Execute the query in Python
def noidnex_post(wp_id):
    sql = f"update wp_yoast_indexable set is_robots_noindex = 1 where object_id = {wp_id};"
    noindex_query = mydb.cursor(buffered=True)
    noindex_query.execute(sql)
    mydb.commit()
    return "noindex"

no_impressions_count["Index Status"] = no_impressions_count["WP ID"].apply(lambda wp_id : noidnex_post(wp_id))
Now all the posts in our data frame have noindex meta robots, and you can randomly check the pages to make sure that it worked.
or you can execute another query to get the number of the indexed and noindexed pages from the database by following the below script.
Get the number of noindexed pages from the database
sql = "select count(*) from wp_yoast_indexable where is_robots_noindex = 1 and object_type = 'post';"
check_index_query = mydb.cursor(buffered=True)
check_index_query.execute(sql)
noindexed_count = check_index_query.fetchone()[0]
print(noindexed_count)
Get the total number of all posts
sql = "select count(*) from wp_posts where post_status = 'publish';"
all_posts_query = mydb.cursor(buffered=True)
all_posts_query.execute(sql)
all_posts_count = all_posts_query.fetchone()[0]
print(all_posts_count)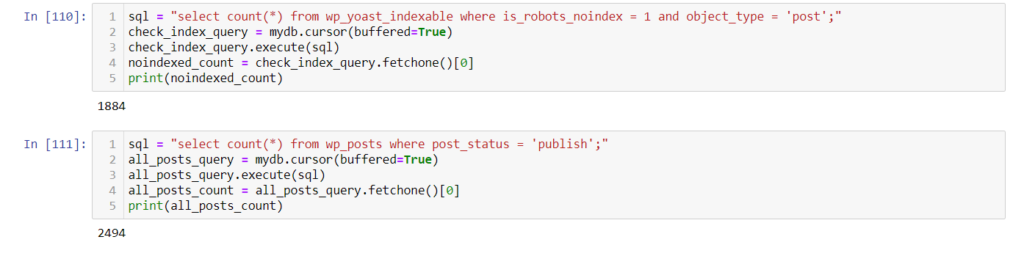
We see that we have the exact numbers similar to our data frame, so our script worked perfectly without any issues.
Also, we can visualize the numbers to compare the percentage with the original data frame, which was 75% of the pages have no impressions, and 25% have impressions.
index_vs_noindex_posts = [noindexed_count,all_posts_count]
plt.pie(impressions_groups,labels=["noindex","index"],autopct='%1.1f%%')
plt.title('Index Vs Noindex Pages')
plt.axis('equal')
plt.show()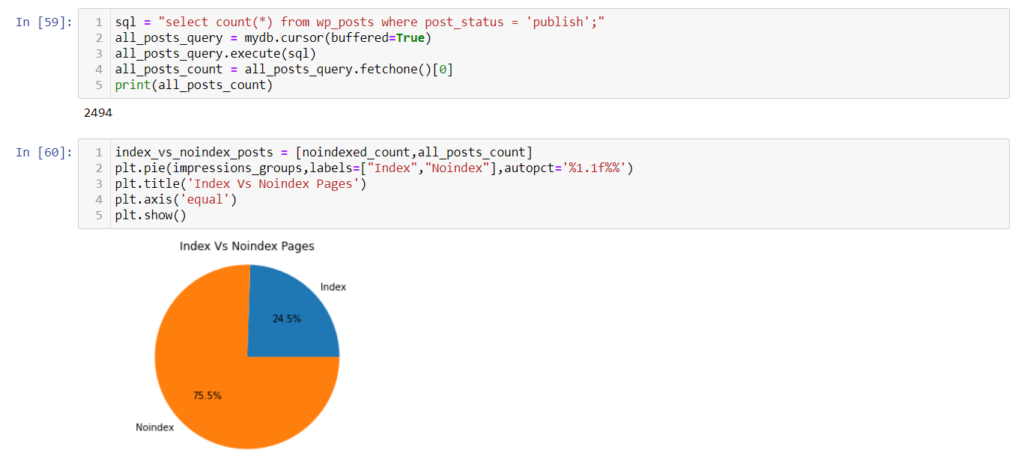
The above chart shows the same percentages, 75% noindex, and 25% index.
Keep Track of Your Indexing Strategy
After doing all the above, it's better to have all the details about your indexed and non-indexed pages in a sheet. You might need them later or if you want to revert your work in case you did anything wrong.
We can do that by getting the data from our WordPress database. This time, we will join two tables together to retrieve the below details.
- Post ID
- Post Title
- Post URL
- Post Indexing Status
- Indexing Status Updated Date
- WordPress post update link
The below query will do the job for us
Select
    wp_posts.ID,
    wp_posts.post_title,
    wp_posts.post_name,
    wp_yoast_indexable.is_robots_noindex
From
    wp_posts left Join
    wp_yoast_indexable On wp_yoast_indexable.object_id = wp_posts.ID
Where
    wp_posts.post_type = "post" And
    wp_posts.post_status = "publish"
And we can do it by Python to store the data in a data frame then export it to CSV
sql = "Select wp_posts.ID,wp_posts.post_title,wp_posts.post_name,wp_yoast_indexable.is_robots_noindex From wp_posts left Join wp_yoast_indexable On wp_yoast_indexable.object_id = wp_posts.ID Where wp_posts.post_type = 'post' And wp_posts.post_status = 'publish'"
report_query = mydb.cursor(buffered=True)
report_query.execute(sql)
indexing_data = report_query.fetchall()

wp_ids = []
wp_titles = []
wp_urls = []
wp_indexing = []
wp_indexing_date = []
wp_update_link = []

for row in indexing_data:
    wp_ids.append(row[0])
    wp_titles.append(row[1])
    wp_urls.append("https://www.selectcaredirect.com/" + row[2])
    if row[3] == 1:
        wp_indexing.append("Not Indexed")
    else:
        wp_indexing.append("Indexed")
    wp_indexing_date.append(date.today())
    wp_update_link.append(f"https://www.selectcaredirect.com/wp-admin/post.php?post={row[0]}&action=edit")

wp_dic = {"WP ID":wp_ids,"WP Post Title":wp_titles,"WP URL":wp_urls,"WP Indexing Status":wp_indexing,"WP Indexing Updated Date":wp_indexing_date,"WP Update Link":wp_update_link}
wp_df = pd.DataFrame(wp_dic,columns=["WP ID","WP Post Title","WP URL","WP Indexing Status","WP Indexing Updated Date","WP Update Link"])
display(wp_df)
wp_df.to_csv("indexing-data.csv", index = False)
And the final results will look like this

You can play with the script to do more automation with WordPress by changing little things. I hope this script will help you in your SEO work.
If you have ideas on automating other WordPress tasks using Python, please share them with me on my Linkedin profile. I am always open to new ideas and collaborations on projects like this.
Related Posts


About the Author